You know those mornings when your closet is technically full but your brain files an official complaint: “I have nothing to wear”? That has been half my twenties and a disturbing portion of my thirties. The plot twist came the day I realized the most underrated fashion tool was not a new outfit, but a pair of scissors and an old T‑shirt that had seen too many laundry cycles.
Since then, I’ve been quietly carving up cotton like a budget-friendly fashion surgeon. And in 2026, when trends swing between “hyper-minimal” and “I just survived an aesthetic apocalypse,” cutting your own tees is not just acceptable, it’s weirdly on trend.
Here are the cutest, actually wearable ways I’ve cut T‑shirts that have personally rescued my “nothing to wear” days — no sewing machine, no design degree, just calculated chaos.
The 2026 T‑Shirt Crisis (and why scissors are the hero)
We live in a time when you can buy a “distressed designer T‑shirt” for the price of a decent weekend trip. Holes. Raw hems. Fake paint splatters. Somewhere, a grandmother is crying.
But that’s exactly why DIY cutting makes sense now:
- Trends already look DIY, so yours just looks intentional.
- Fast fashion is exhausting; upcycling feels like a tiny rebellion.
- A cut tee can switch an outfit from “I tried nothing” to “Oh, this old thing? It’s custom.”
So yes, we’re doing this. But we’re doing it with a plan, not a horror movie.
Ground rules before you attack cotton
Before we start slicing, a few survival rules from someone who has turned a perfectly good T‑shirt into a cleaning rag in under 30 seconds.
- Start with a not-favorite T‑shirt. That free event tee, the one with the weird logo? Perfect testing ground.
- Use sharp fabric scissors. Kitchen scissors will only give you jagged cuts and an identity crisis.
- Try it on, mark it, then cut. Use tailor’s chalk, a pencil, or pins to mark where you want to cut while the shirt is on your body.
- Cut less than you think. Cotton stretches. You can always make the hole bigger; you cannot uncrop a tee.
- Wash it after cutting. Raw edges curl in a nicer way after a wash. It smooths out the DIY energy into “I bought this like that.”
Now, to the fun stuff.
The inside-out shoulder peek (for when you want “effortless” in 3 minutes)
The first cut that truly saved a nothing-to-wear morning started with a shirt that felt like it belonged to my high school self: boxy, boring, and judging me. I gave it a tiny operation at the shoulder, and it suddenly looked like something I’d seen on a Copenhagen street style reel.
What it looks like: A slightly off-shoulder tee with a soft, asymmetrical neck opening. It shows just enough collarbone to look deliberate, not like your laundry shrank things unevenly.
How to do it:
- Lay the T‑shirt flat.
- On one side only, mark a new neckline that dips slightly lower, starting around the collarbone and sloping gently to meet the original collar at the other shoulder.
- Cut along this line, including the existing collar on that side.
- Give the cut edge a gentle tug so it curls inward.
- Try it on and slide it so one shoulder peeks out.
Why it works on nothing-to-wear days: It’s still a T‑shirt. You can wear it with jeans, a skirt, or under a blazer. But the shoulder cut says, “I might accidentally end up in a rooftop bar later,” which is more than you can say for a normal crew neck.
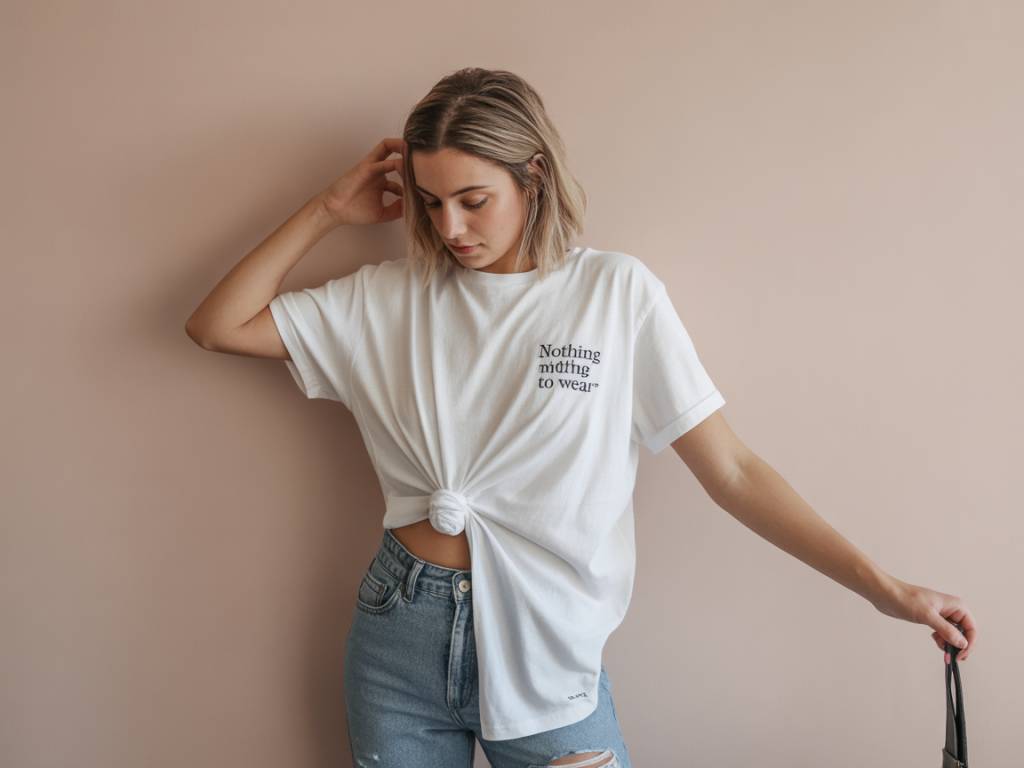
The lazy model off-duty tee (front knot without the awkward bulk)
This one started as an attempt to fake that “I just styled this in a cab” look you see on people who never appear sweaty or rushed. The problem with the classic “tie a knot in front” move? Bulk. The fabric bunches and suddenly your stomach has a cotton tumor.
The fix: cut the shirt so the front can knot neatly but the back hangs loose and relaxed.
What it looks like: Cropped in front with a tie, long and drapey in the back. Great with high-waisted anything.
How to do it:
- Put the T‑shirt on and mark a line across your hips where you’d like the front to end (usually just above the waistband).
- Take it off and lay it flat.
- On the front only, draw a shallow U-shape that dips about 5–7 cm lower than your line in the middle.
- From the lowest part of the U, draw two narrow “tails” about 4–5 cm wide and 10–15 cm long. These will become the ties.
- Cut along your lines: U-shape and then down the sides of the tails.
- Leave the back of the shirt uncut for now.
When you knot the two tails, you get that tied-front look, but with less bulk and more intention. The back stays full-length, so you don’t feel half-dressed if you turn around.
Why it saves outfits: It turns a shapeless tee into a flattering shape without exposing your entire midriff. Toss it over leggings when you’re “just going for coffee” and then mysteriously end up out all day.
The 5-minute corset tee (for when your night out outfit betrays you)
This one happened on a night where everything “going-out appropriate” either didn’t fit, didn’t zip, or didn’t match my mood, which was somewhere between “chaotic neutral” and “soft villain.” I grabbed an oversized black T‑shirt and turned it into something close to a soft corset top with nothing but vertical cuts and a ribbon.
What it looks like: Fitted in the waist, slightly structured, laced up at the back or sides. Imagine your T‑shirt did a semester abroad in Paris.
What you need:
- An oversized T‑shirt (longer is better).
- Ribbon, cord, or a shoelace you won’t miss.
- Scissors. And mild courage.
How to do it (back-laced version):
- Put the T‑shirt on inside out.
- Pin or mark the narrowest part of your waist.
- Take it off and lay it flat with the back facing up.
- Draw two vertical lines on the back, each about 5–7 cm from the side seams, from just below the shoulder blades down to your waist mark.
- Along each line, cut small horizontal slits (about 1.5 cm wide), spaced 2–3 cm apart.
- Weave your ribbon or cord through the slits like shoelaces.
- Put the shirt on, pull the laces to cinch the waist, and tie a bow.
Why it wins: It works over a slip dress, over a long-sleeve mesh top, or alone with jeans. It takes the word “T‑shirt” and quietly adds “but make it storyline.”
The spine ladder tee (your back gets to be the main character)
This one is for the days when the front of your outfit says “I’m chill” and the back quietly whispers, “I did not, in fact, come to play.” A laddered spine tee looks complicated but is basically strategic slits and a bit of stretching.
What it looks like: A series of horizontal cuts running down the back that, once stretched, form a braided or ladder-like pattern. Very 2026 gym goth if you do it in black.
How to do it:
- Lay the T‑shirt flat with the back facing up.
- Mark a vertical strip down the center of the back, from about mid-shoulder to just above your lower back.
- Cut evenly spaced horizontal slits (about 2 cm apart) across this strip. Each slit should be 8–10 cm wide, depending on your shirt size.
- Gently tug each strip to stretch it so the edges curl.
- Option A (simple): leave it as is. The stretched fabric already looks intentional.
- Option B (braided): Take the top strip, loop it over the one below, then keep “feeding” each strip through the next one down, all the way to the bottom. Secure the last one with a small stitch or a tiny knot.
Why it rescues your mood: From the front, you’re just wearing a T‑shirt. From the back, you’re the main event. Perfect for gym days, festivals, or any time you want to look like you planned things more than you did.
The no-sew wrap tank (for heatwaves and last-minute brunches)
On a summer morning when the weather app feels like a threat and everything in your closet looks too heavy, a wrap-style tank out of a T‑shirt is a lifesaver. It’s essentially turning your tee into something that looks almost… tailored.
What it looks like: A sleeveless, slightly cropped wrap top with a V-neck, tied at the side or back.
How to do it:
- Choose a T‑shirt that’s one size larger than your usual for extra wrap fabric.
- Lay it flat and cut off both sleeves along the seam.
- Cut off the collar to open the neckline into a scoop.
- On the front, cut straight down the center from the neckline to the bottom hem so the front opens like a cardigan.
- Angle the lower edges slightly to create two front “panels” that overlap nicely across your torso.
- Cut two long strips from the leftover sleeves or hem and attach (with a small knot through the fabric or a safety pin hidden on the inside) to the lower corners of the front panels as ties.
You now have a wrap tank: cross the panels over the front, wrap the ties around your waist, and knot them at the back or side.
Why it fixes the “I’m melting” days: It looks chic with wide-leg trousers, denim skirts, or even over a slip dress, but it started life as a T‑shirt. Low-cost, high-impact, and the breeze finally has options.
The deconstructed bolero shrug (for layering when your outfit is almost there)
This one came from staring at a too-tight long-sleeve tee and refusing to admit defeat. Instead of donating it, I turned it into a shrug — the kind of piece that fashion people wear over tiny tops and somehow call it an outfit.
What it looks like: Sleeves plus a narrow strip across the back, open in the front. A cropped bolero you can throw over tanks, dresses, or sports bras.
How to do it:
- Start with a long-sleeve T‑shirt or lightweight sweatshirt.
- Lay it flat.
- Cut straight up the center of the front from hem to collar.
- Cut off most of the front body fabric, leaving only a band of fabric across the shoulders and back (about 10–15 cm wide), attached to the sleeves.
- Trim the front edges into soft curves if you want a more elegant shape around the chest.
Slip it on, and you’ve got instant sleeves without the commitment of a full top.
Why it saves outfits: It rescues strappy dresses that feel too bare, gym tops that need a little cover, or outfits that are “perfect… if I just had something small over my shoulders.” Now you do.
When the cut goes wrong: turning failures into accessories
Let’s be honest: not every T‑shirt cut ends in triumph. Some end in silence and a very direct walk to the trash can. But you don’t have to lose everything.
When a project goes sideways, I usually do this instead:
- Turn the bottom hem into a headband. Cut off the hem, stretch it, twist it once, and loop it into a double band. Minimalist, surprisingly expensive-looking if the fabric is nice.
- Make a braided belt. Cut three long strips from what’s left, braid them, knot the ends. Wrap around dresses, oversized shirts, or even as a tie for a light coat.
- Create laces or ties for other projects. Keep long, intact strips in a drawer. Future-you will thank past-you when you need a ribbon to cinch that corset tee or wrap top.
- Use scraps as practice. Before trying a tricky technique (like braiding the back ladder), practice on leftover pieces so you don’t accidentally invent a garment that only makes sense in the dark.
Ruined T‑shirts become raw material. In 2026, that’s practically a fashion philosophy.
How to know which cut your day needs
If you’ve made it this far, you’re probably mentally cataloging which old tees you’re willing to risk. The real trick is matching the cut to the crisis.
- Running late, need low effort, still want compliments? Inside-out shoulder peek or model off-duty tie front.
- Last-minute night out, everything feels basic? 5-minute corset tee or spine ladder back.
- Heatwave, brain offline? No-sew wrap tank, every time.
- Outfit is almost right but missing one layer? Deconstructed bolero shrug.
- DIY went rogue? Accessories. Always.
The fun part isn’t just the cuts themselves, it’s the small private satisfaction of wearing something you edited yourself. The label might say “100% cotton,” but the real composition is 50% fabric, 50% story.
And the next time your closet tries to convince you that you have “nothing to wear,” you can look it in the eye, pick up a pair of scissors, and politely disagree.